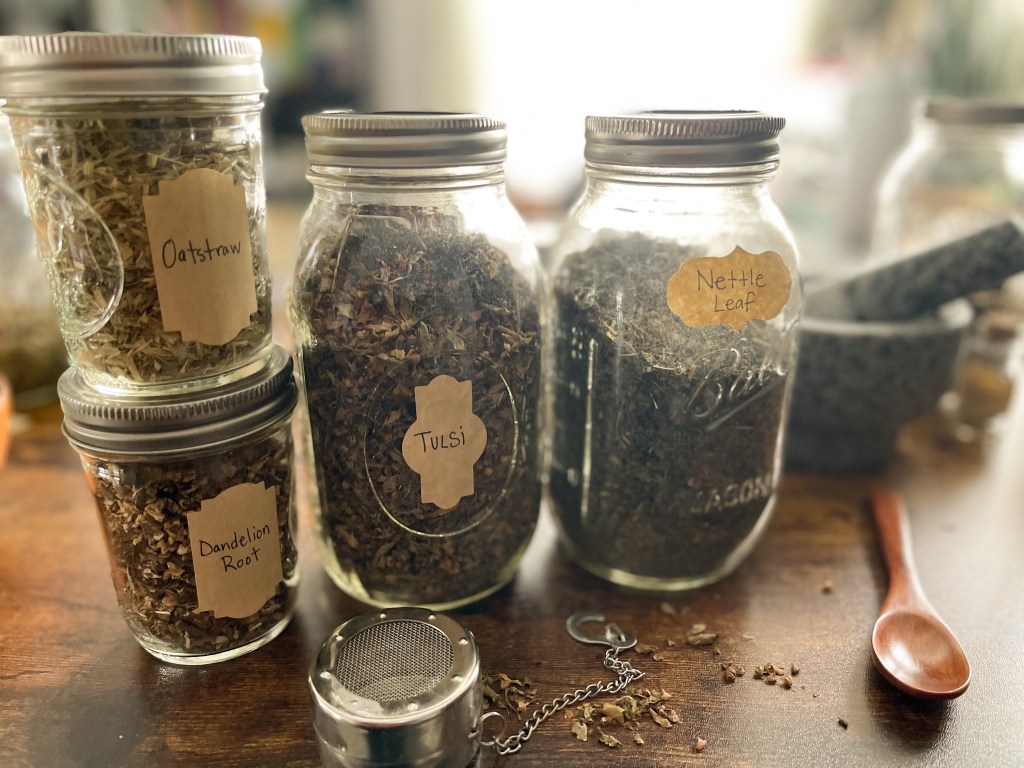
This mama was SICK for Christmas. I caught a nasty stomach virus and was down for the count for a couple days. Ever since, I’ve felt weak and depleted! My muscles feel sore and weak, I am feeling extra worn down, and my stomach is still not back to normal. So, I thought I would turn to my apothecary and make some restorative tea today to help me bounce back.
Some of my favorite herbs for building back strength after an illness include (but are not limited to!) nettle, oatstraw, dandelion root, and tulsi. You could combine all four into a soothing tea, or turn to your favorite tinctures and tea blends that contain these allies.
Here is a little bit of information on how these herbs help after an illness!
Nettle is a powerful nourishing and nutritive adaptogen that excels at building strength. Among so many benefits, it helps with fatigue, rebuilding deficient nutrients, building blood, and flushing things out.
Oatstraw aids in some of the same ways as nettle, with a bit of a different approach and the benefit of being a relaxing nervine. It is incredibly replenishing, tasty, and helps with burnout and exhaustion.
Dandelion root does important work by aiding liver function. It is nutritive, helps rebuild gut flora, aids in digestion and flushing things out, and is incredibly grounding to boot.
Tulsi is my go to herb for many things! It is an incredibly helpful adaptogen and a relaxing nervine, aiding in balancing things out and bringing you back to center.
What are your favorite herbs or remedies for rebuilding strength after illness?
To celebrate the winter solstice and Yule, I have made some special candles to help mark the occasion as my family and I make (and eat!) cookies and read books about the solstice. Although it is the official beginning of winter, it is also the darkest night—and the light of our candles reminds us that the warmth of the sun shines through and will strengthen with each coming day. It is how people have long gathered their courage to face the winter’s cold: the returning of the light offers hope.
For my Yule Forest candles, I combined beeswax, a bit of coconut oil, and essential oils for a natural scent option. (Make sure you do your due diligence in choosing ethical essential oil companies to buy from 💚). Here are the scents I chose, along with their symbolic attributes:
Here are the directions for making the candles if you’d like to make some, too!
Making 6 candles:
We will enjoy the gentle light and wintry woods scent of one of these candles (I made 6 so I could gift the others to loved ones) while munching on chai snickerdoodles and reading. The pictured books (Goodbye Autumn, Hello Winter and the winter story from Little Witch Hazel) are a couple of our favorites to welcome the solstice.
One of my new favorite things to make is lotion bars, made with herbal infused oils! They’re easier to make than you might think, and feel so soothing and luxurious on your skin.
I started with olive oil I had infused with calendula a while back for skincare purposes. Calendula is very healing and beneficial to the skin, and olive oil is quite moisturizing and good for the hands, arms, and legs. Very helpful this time of year when we begin getting dry, chapped skin from the cold & dry weather!
I combined the herb-infused oil with beeswax and shea butter, then added a small bit of tangerine essential oil for a cheery scent addition. (The essential oil is optional, though. Also, remember to choose ethical essential oil companies to buy from!)
Here is the full recipe, in case you’d like to make some of your own!
Calendula Olive Oil Lotion Bars
(Makes 8 good sized lotion bars)
Materials:
Silicone molds or silicone cupcake liners
Double boiler (optional)
112 g shea butter
80 g beeswax pellets
96 g olive oil infused with calendula flowers
12-16 drops essential oil (optional; I used tangerine)
Method:
Prepare your supplies and area; you might want to put down a layer of parchment or waxed paper in case of dribbles.
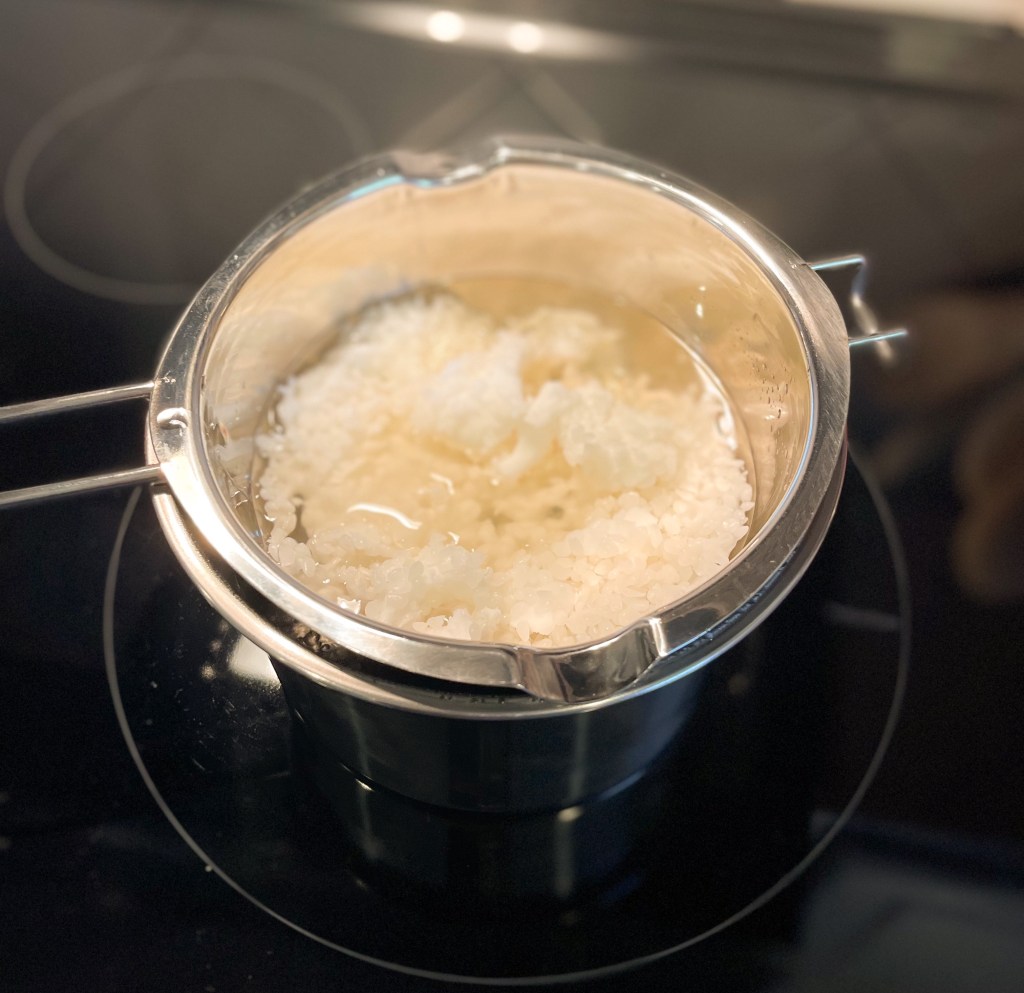
Melt the beeswax pellets, shea butter, and calendula olive oil slowly over low heat in the double boiler. If you don’t have a double boiler, set a large glass mixing bowl over a small saucepan containing about 1 inch of water, put your ingredients in the mixing bowl, and it works the same way.
Once the ingredients are melted, remove from heat and carefully add and stir in essential oil if you’re using it.
Carefully pour the hot liquid into your silicone molds. Allow to cool completely for a good long while before trying to turn them out—I like to have the molds all lined up on a baking sheet and transfer that to the fridge for quicker setting, but that’s optional.
Once the lotion bars are finished, store them in individual small tins, waxed paper bags, or jars for gifting. They warm up quickly when rubbed against the skin and turn into a light but nourishing lotion. These can double as lip balm, too!
I made a couple batches of these and plan to gift them to friends and family for the holidays! (Sorry for the spoiler, friends and family! 😂) They’re such a nice little handmade gift that feels extra special. And the calendula oil is like a bit of sunshine to soak up during the winter months!
This recipe was inspired by a recipe in 101 Easy Homemade Products for your Skin, Health, and Home by Jan Berry.
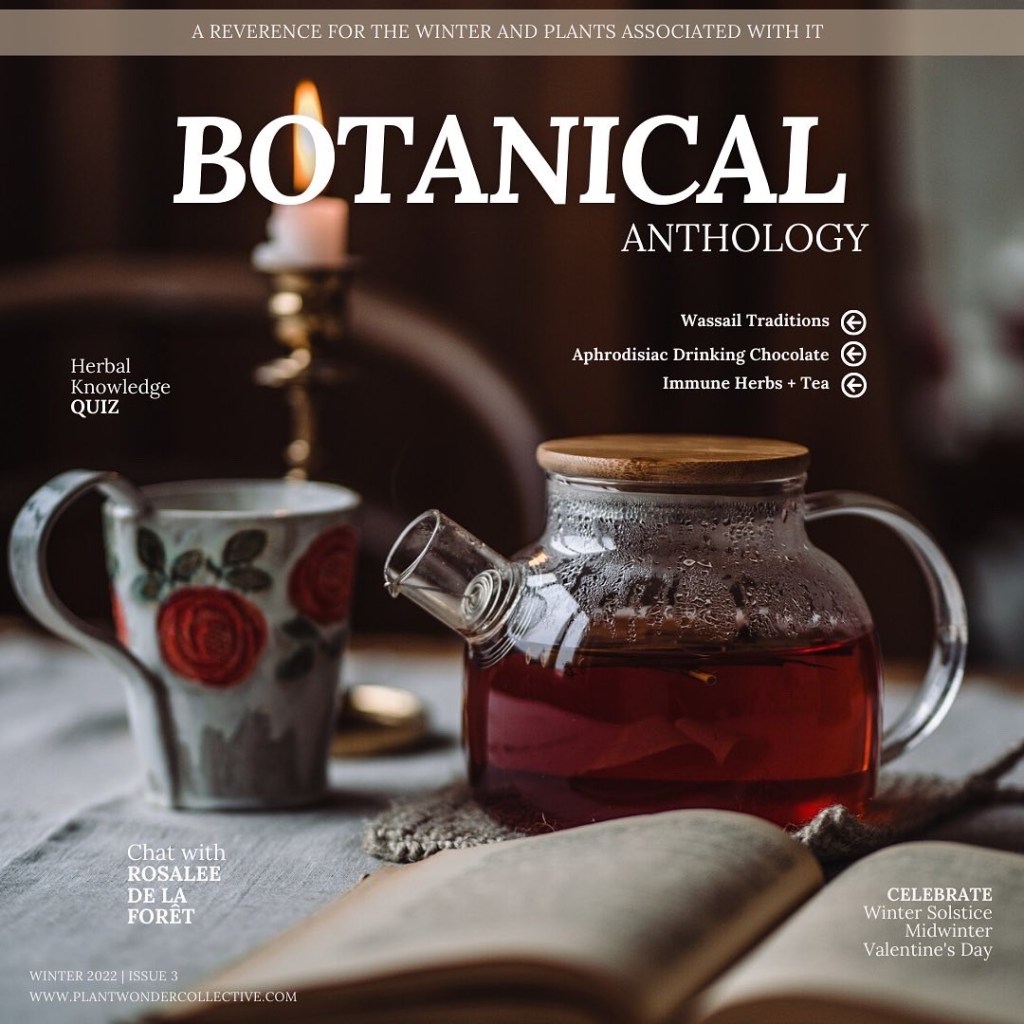
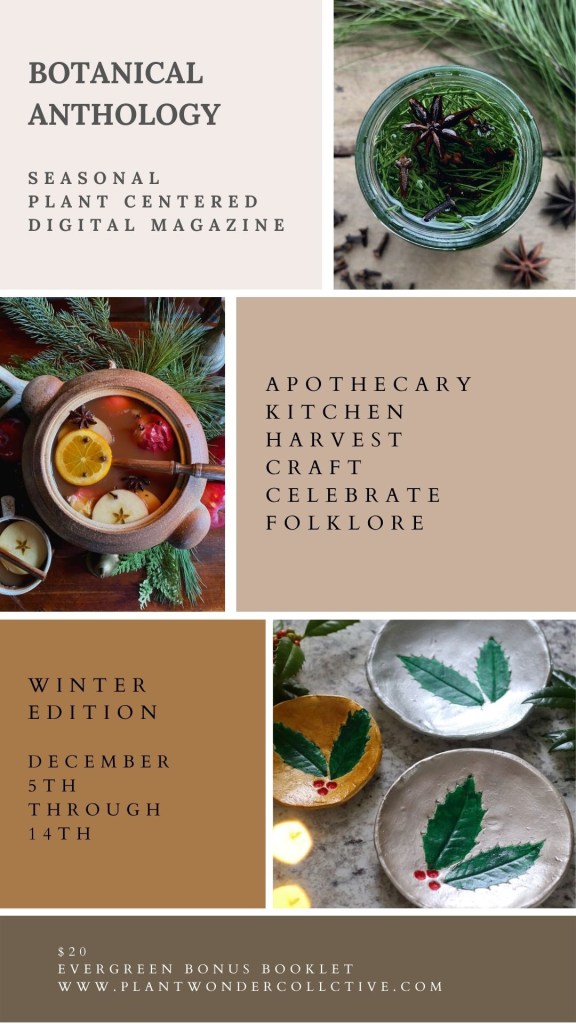
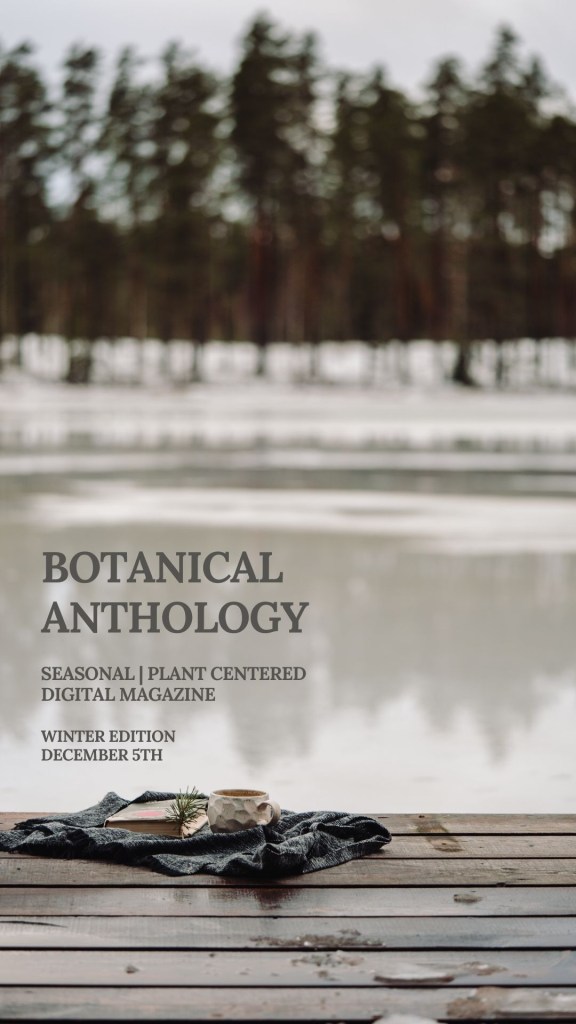
I am proud to say that the winter edition of Botanical Anthology, a plant-centered, seasonal digital publication with over 45 articles from 30 contributors, is available for purchase!
I am so excited for this beautiful publication to be out in the world, and so proud to be a part of it along with so many creative contributors. This issue is gorgeous and bursting at the seams with lovely, cozy, healing, creative, and meaningful ways to tap into the spirit of the winter season. I personally can’t wait to dive into all the inspiring lore, wisdom, recipes, rituals, crafts, and more.
In the winter edition, you’ll find articles, recipes, and ideas to help you:
*Sip on immune tea, miso broth, wassail + gingerbread golden milk
*Learn how to make ghee, gluten free sourdough and activated nuts
*Whip up hand sanitizer, a warming foot bath and body butter
*Forage wintergreen, raspberry stems and chaga
*Develop rituals + routines for the season ahead while listening to a winter playlist
*Weave wreaths, make trinket dishes + draw narcissus
*Celebrate Winter Solstice, Midwinter + Valentine’s Day with simple observances
And so much more!
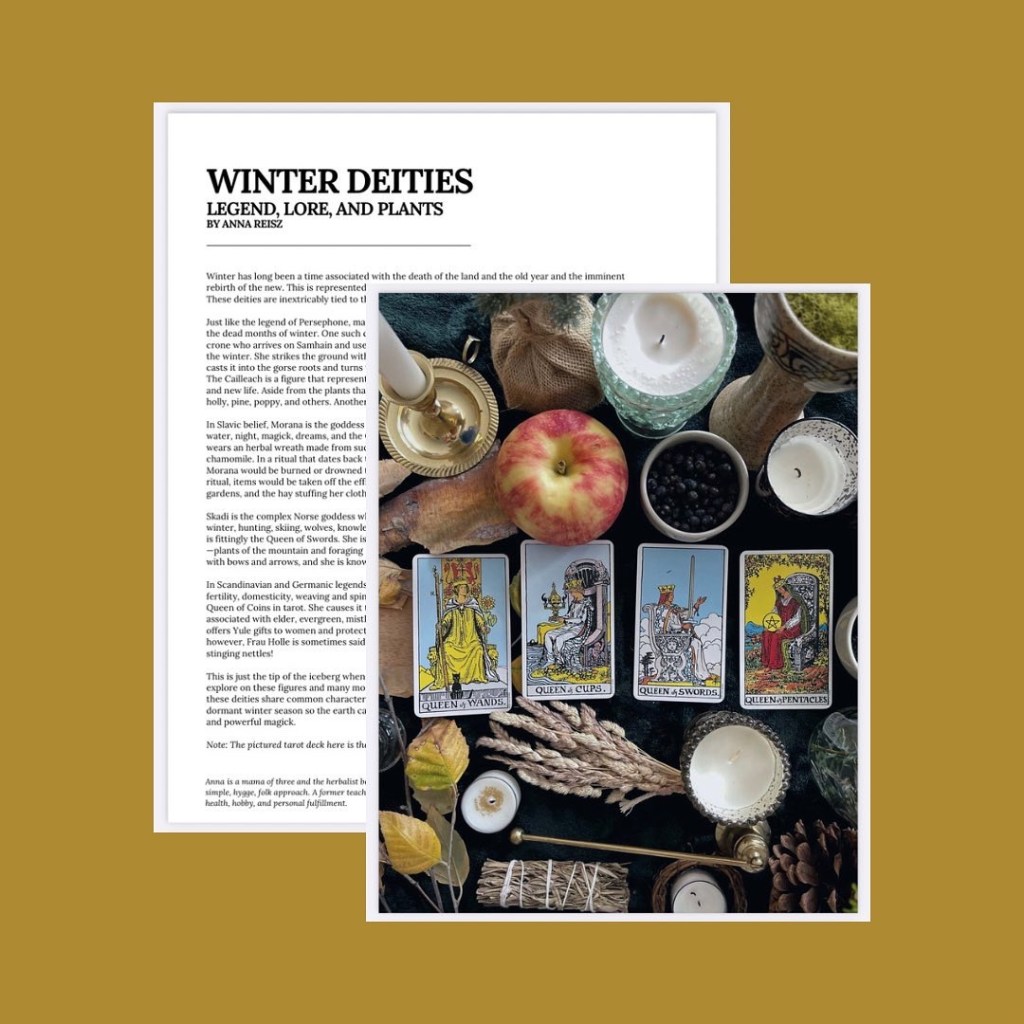
I contributed five pieces to this edition, including an article about immune-boosting herbs with a tea recipe, a piece about the folklore surrounding juniper, a deep-dive into a few winter deities and their plant associations, and a review of one of my favorite books about tea. I so enjoyed writing these articles, and I hope you get a chance to read them!
The Botanical Anthology is a seasonal digital magazine for plant and nature lovers with articles to help you incorporate herbs into your home apothecary, kitchen, foraging, crafts, and wintertime celebrations. It was founded by the Plant Wonder Collective, a group of like-minded plant lovers from a variety of backgrounds and walks of life who each have unique perspectives and approaches to share. Nurture your mind, body, and spirit through the winter season with the words and ideas from our hearts to yours!
Until 12/15, grab your copy for $20 and receive the bonus evergreen booklet. Download instantly and dive right into the 150+ pages of plant magic!
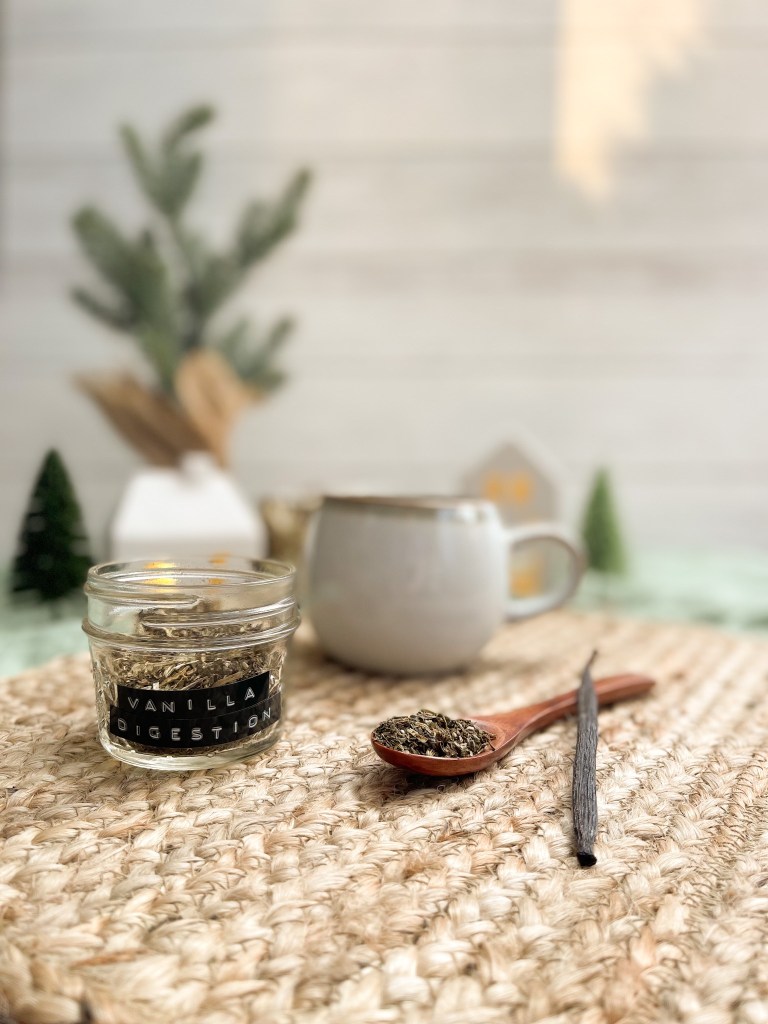
It’s the time of year when digestion is key! Heavy, rich foods abound due to the holidays and the approach of winter, and many of us need some extra relief.
Often, digestion teas rely heavily on ginger, but I find it too spicy and irritating sometimes. I often need more of a cooling approach to indigestion instead. That’s where this tasty vanilla digestion tea comes in!
Vanilla is an aromatic stimulant and carminative botanical, with anti-inflammatory, digestive-soothing, calming, and fever easing benefits. These properties make it a great ingredient in a digestion tea!
In the interest of a more cooling approach to digestion, I’ve combined the vanilla with meadowsweet, mint, and fennel seed. If you add honey or your sweetener of choice, it’s a light and tasty dessert all on its own with a taste reminiscent of candy canes!
A bit of a breakdown of the other herbal ingredients I’ve combined with the vanilla here—
Mint can be both warming and cooling, depending on your constitution, but I find it affects me in a soothing and cooling manner. It is a mildly stimulating herb, so it aids in moving things along in the digestion process.
Meadowsweet is a top tier digestion reliever. Its cooling, drying, astringent, inflammation modulating, and even pain modulating properties make it an indispensable ally. However, if you’re sensitive to aspirin, you should avoid meadowsweet because it contains naturally-occurring salicylic acid. (If this is you, substitute chamomile or elderflower.)
Fennel is one of my very favorite herbs for digestion. It’s a pungent aromatic herb with antispasmodic and carminative properties, making it ideal for a digestion tea. Interestingly, I found a hand-written note in my great grandmother’s herbalism books suggesting to use fennel for calming. Though it isn’t technically considered a nervine or adaptogen, there is an inextricable link between gut health and mental health, so it does check out!
Here is the simple and sweet recipe for cooling vanilla digestion tea:
1 part vanilla (use chopped vanilla beans or powdered vanilla bean—my choice for economical purposes)
2 parts meadowsweet
2 parts mint
1 part fennel seed
——
Brew for about 5 minutes; longer can cause a bitter taste from the meadowsweet.
Do you suffer from digestive issues this time of year? Let me know if you try this tea! You might find that soothed digestion leads to a calmer state of mind this time of year!
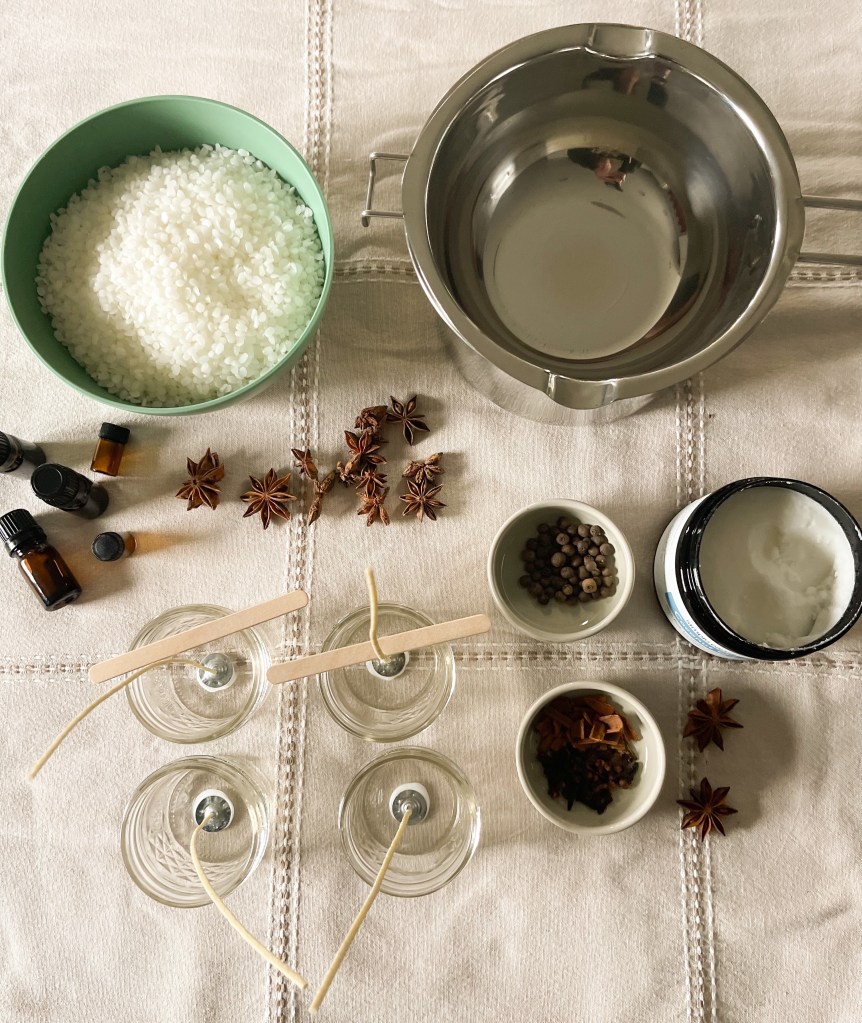
I am *just* beginning to teach myself the art of candle making! It is not terribly difficult, but there is definitely a knack to it and little things to learn through the process. I am no expert yet, but I am quickly learning some of the finer points!
I have decided to use a combo of beeswax and coconut oil for my candle base for the time being, and I scent my candles with essential oils. The scent is more subtle than that from my favorite store-bought candles, but it’s lovely and natural, healthier, and much more magical and special to make them myself. All the cozy and loving intention is poured into each one with the wax.
For those who are also interested in candle making but aren’t sure where to start, here is a little list of the basic supplies I decided to begin with:
This batch of beeswax candles combines the scents of coffee, cinnamon, vanilla, clove, nutmeg, ginger, cardamom, lemon, blood orange, and balsam copaiba essential oils. (The coffee oil is a separate one from Simply Earth; the rest are in a pumpkin spice oil blend from Plant Therapy.)
Aside from providing a cozy, delicious scent perfect for this time of year, these botanicals are grounding, balancing, energizing, and represent love, luck, and healing. I’ve topped each candle with coffee beans, star anise, allspice, cinnamon, and cloves.
Here are the instructions for how I made this batch of candles—it makes 6 four-ounce candles.
(A couple notes: I am still experimenting with the essential oil amounts. You could definitely use more than I did here for a stronger scent—up to 200 drops! But I went conservative here for lightly scented candles. Also, be very careful topping candles with cinnamon, and make sure it isn’t too near the wick! It can spark if it catches the flame just right.)
I plan to keep a couple of these and share the love by gifting the rest this holiday season! And I hope to make more with different scent profiles and additions soon—I’ll share those here or on Instagram when I do.
Have you ever tried your hand at candle making? Is it something you’re interested in trying?
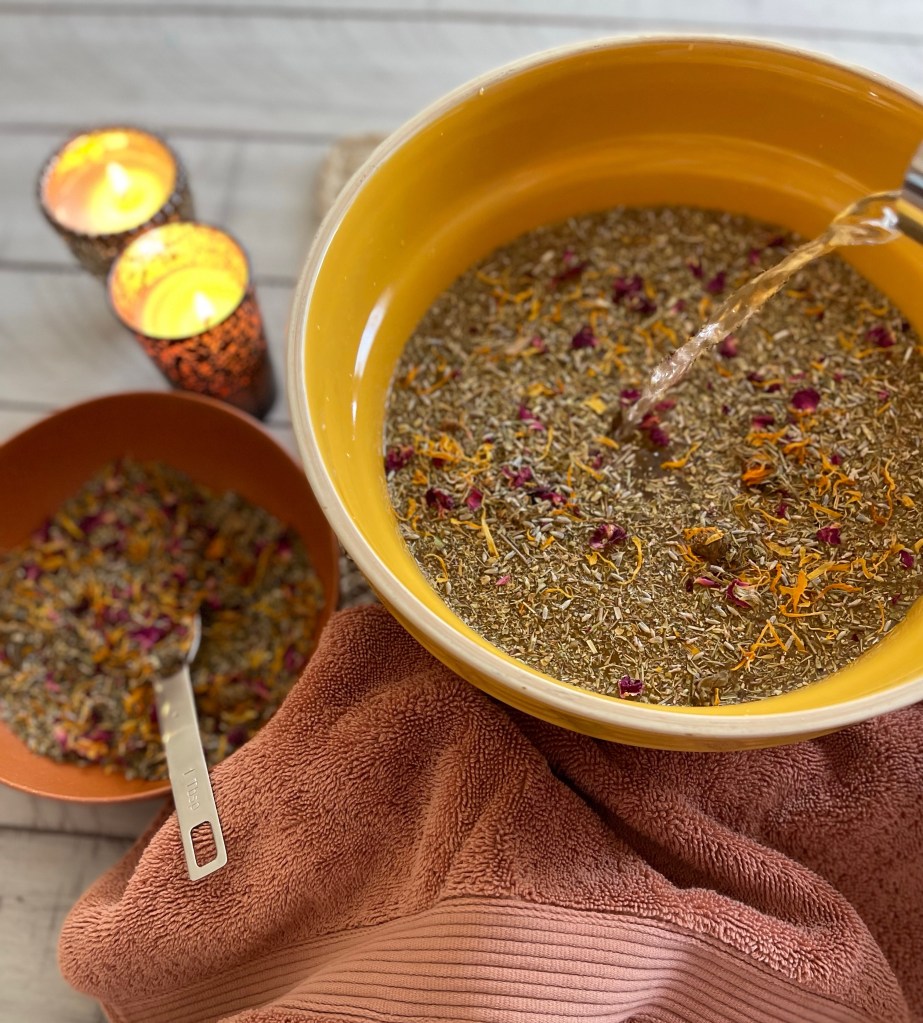
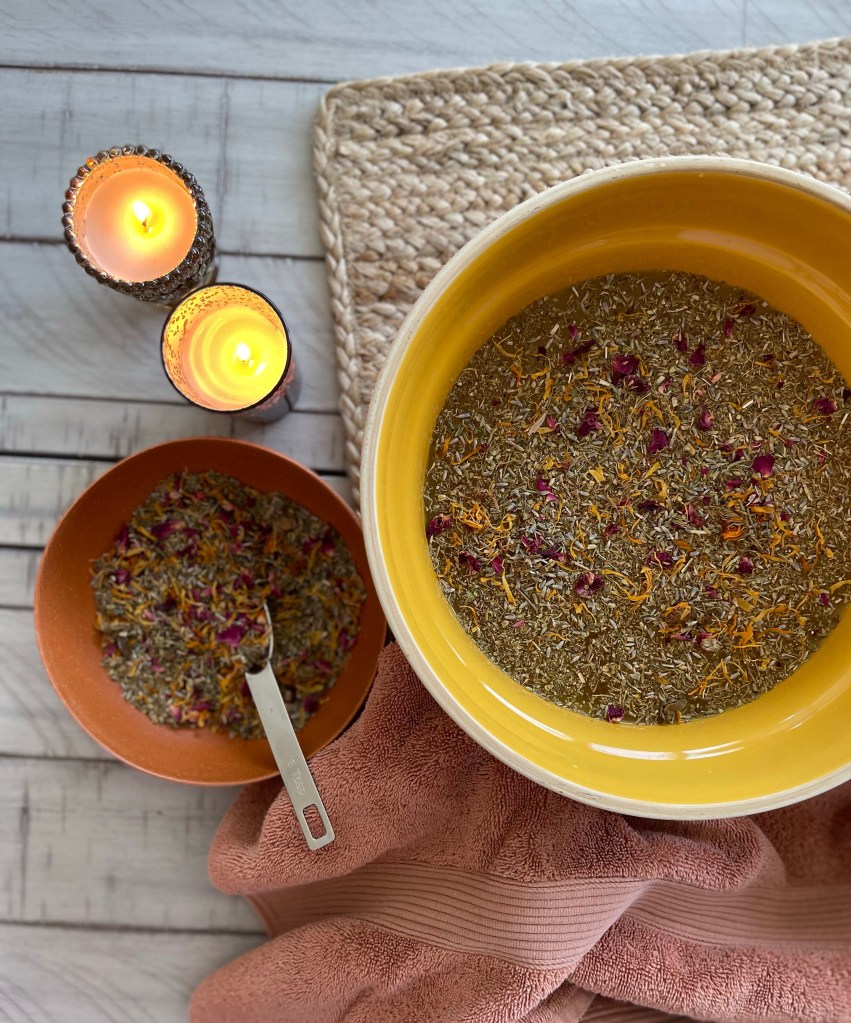
It’s that time of year: colds, coughs, congestion, sinus headaches, the works. I don’t know about you, but I have a constant runny nose, and often a bit of a cough, once my wildlings start bringing fall germs home from school. This also wreaks havoc on my skin! I get dry, sore skin around my nose and sinuses, and my face just feels dry and tight.
So I decided to try something that would be great for both my sinuses and my skin: a facial steam. It’s really quite easy! Just add your herbs to a big bowl, pour in hot water from your tea kettle, drape a towel over your head, lean over the bowl—trapping in the lovely aromatic steam—and let the botanicals do their magic!
Oregano is the star of the show today. With its antimicrobial and lung-soothing properties, as well as its warming and stimulating effects, oregano is a lovely ally. With it I combined rose petals, lavender, and calendula for my skin issues and yarrow and thyme to boost the sinus clearing and germ-fighting properties.
Let me tell you, this was a relaxing and divine way to get some relief! I think I’ll be doing this quite often now.
Here is the recipe, so you can try this lovely steam, too! I used dried herbs to make this recipe, which makes it super simple for wintertime use! For the “parts” size, I used tablespoons, then tripled the recipe; this made more than enough of the mixture to put some in a jar and do it again a few more times.
Mix the dried herbs well in a bowl. In a separate bowl, add your desired amount—I’d recommend 2-3 tablespoons. Then add steaming (not boiling) water heated in a tea kettle. Put a towel over your shoulders and head and lean over the bowl, carefully draping the towel to enclose the hot steam with your face. Close your eyes, relax, and enjoy inhaling the fragrant steam for several minutes!
Have you ever tried a facial steam? If so, which are your favorite herbs to include?
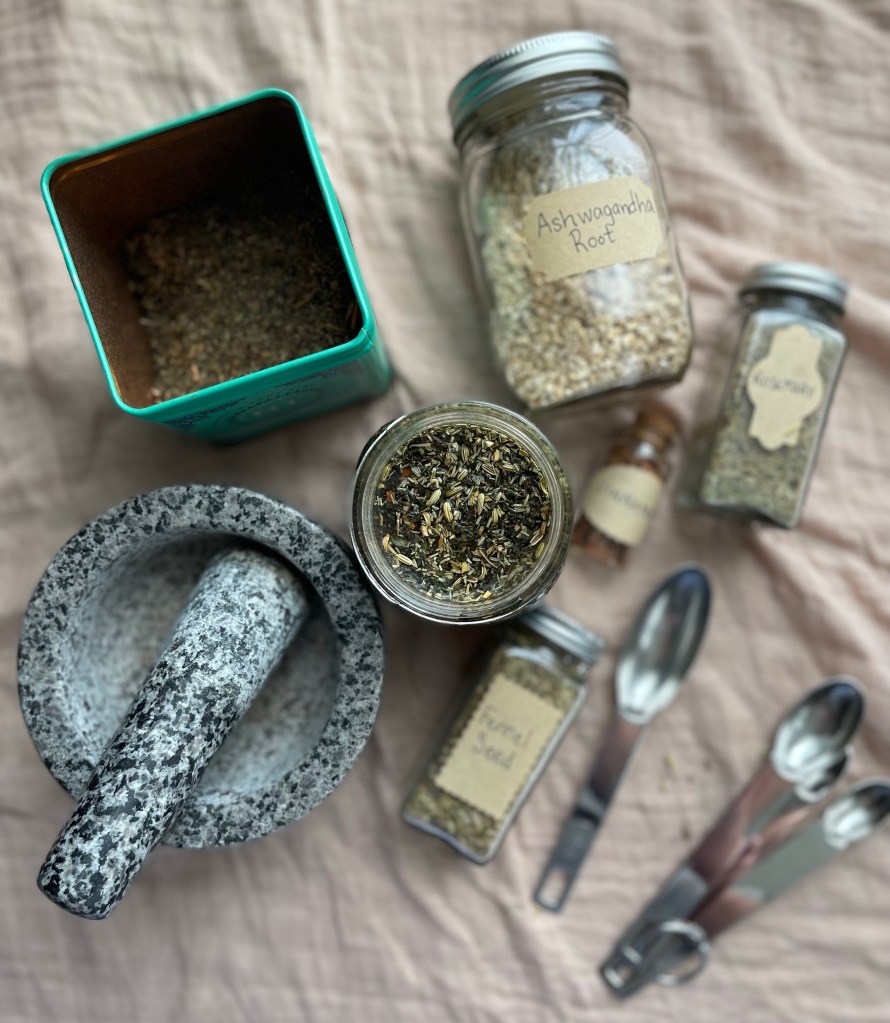
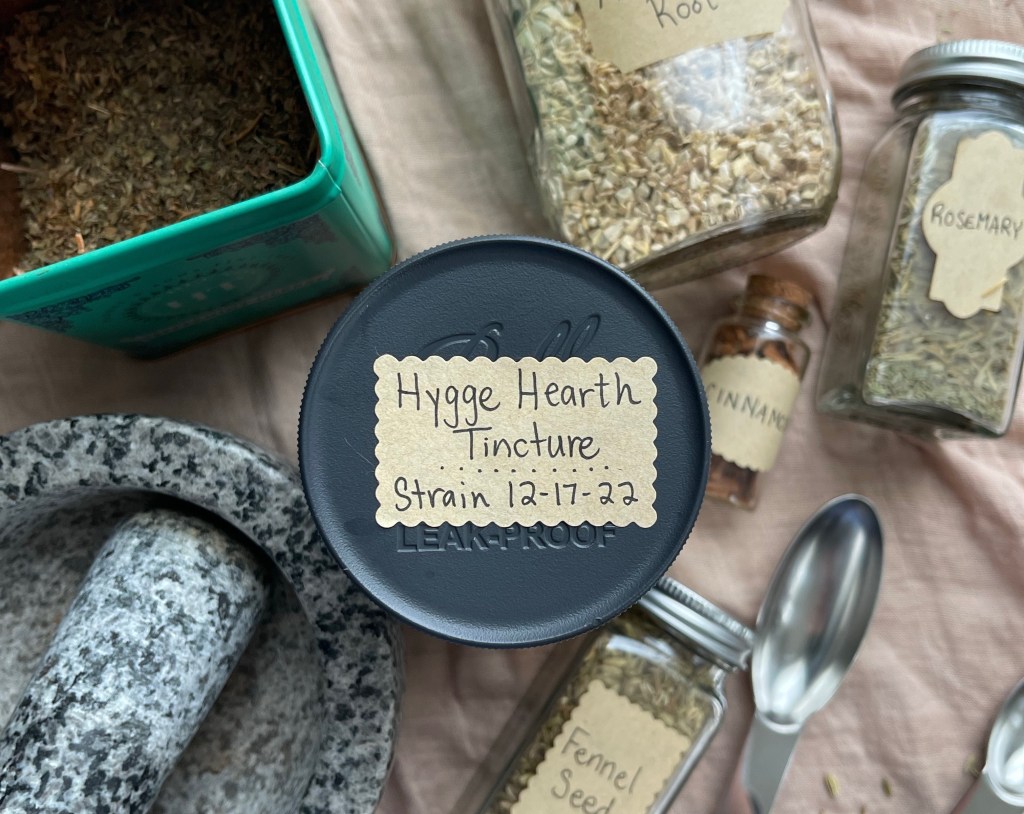
Inspiration struck this morning and I decided to start a tincture that will be ready just in time for Yule! It has all the happy, cozy, hygge vibes with digestion support, stress relief, balancing, and immune boosting to boot.
Mint is the star of the show here, paired with “really good Ceylon cinnamon” (please tell me you read that in Ina Garten’s voice 😂). I adore the sweet combo of cooling mint and warming cinnamon! With these I combined fennel seed, rosemary, and ashwagandha root.
Then I topped it off with not the usual vodka, but GIN for more cozy, botanical, wintry vibes.
Here is the full recipe! For once, I actually loosely measured instead of doing it in parts!
Add herbs to a 16 oz glass jar. Cap and shake the jar thoroughly to mix herbs. Top with gin, filling to near the brim. Cap with a plastic canning jar lid or parchment paper and canning lid. Store in a cool, dark place, shaking daily, and strain after 6-8 weeks. Store in dark glass jars or dropper bottles if you can.
You can take this tincture in tea, coffee, still or sparkling water, ginger ale, juice, or even cocktails! Ginger ale is my favorite vehicle for tinctures—if you prefer, use your favorite homemade or natural ginger ale.
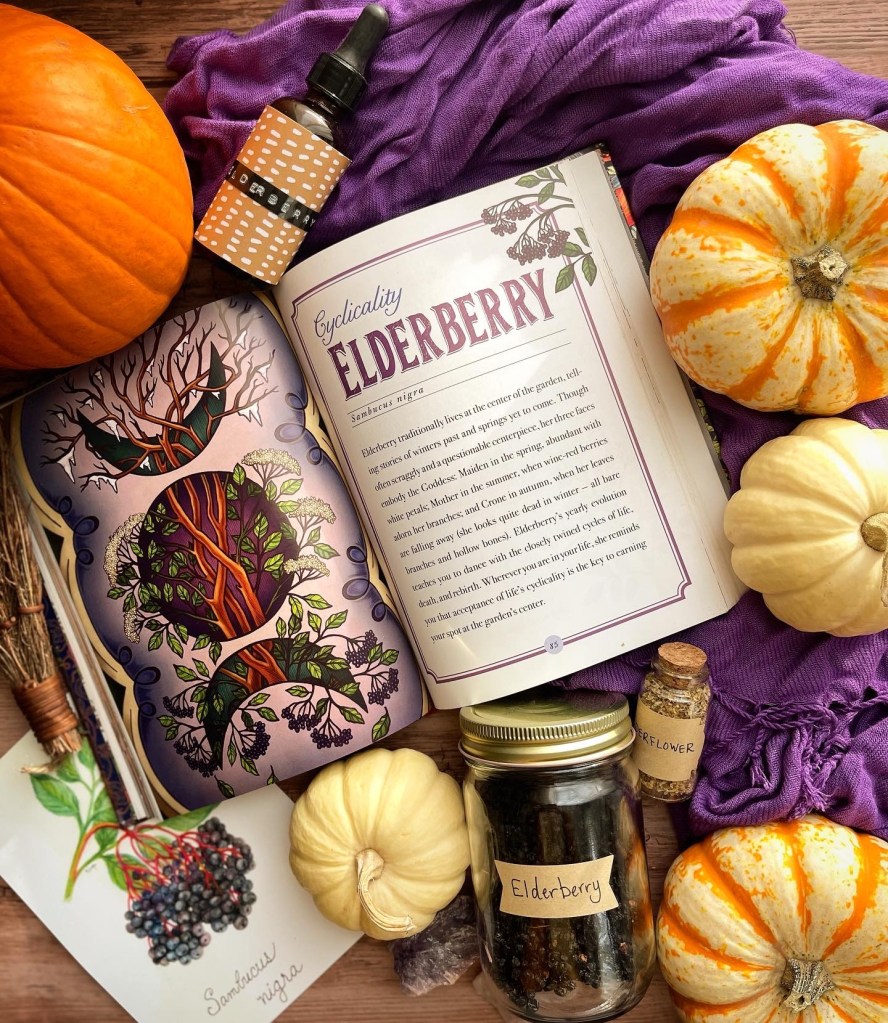
I can’t believe October is already more than halfway through! Life has certainly been busy over here in the Herbology Faerie’s apothecary. My children have been home for their two week fall break, my husband took a trip for work, there have been visitors and visits, sickness, and it’s just been a bit of chaos around here. But I have still been connecting with the plant world, so I am here to share a bit about that!
This month has been elderberry month at the Plant Wonder Collective! I have so enjoyed working with lovely elderberry this October. I have not yet had the time to write up a monograph post for elderberry this month, but I will try to do that before October is done. Meanwhile, here is a link to the Plant Wonder Collective’selderberry monograph post!
I have concocted a couple of fun elderberry potions this month which I have shared on Instagram. I’ll share them here, too, to make them easier to find. First up: an elderberry hot toddy!
Next, I shared the beginnings of my elderberry infused gin this week. It is still infusing, but I will be straining it soon and sharing a cocktail or two made with this lovely liquor. Here is the initial post about its creation!
I hope October is treating you well, friends! Perhaps you’ll find some inspiration here to connect with elderberry in your own ways this month, or in the months to come!
The Autumn Botanical Anthology digital magazine is available TODAY! To celebrate, I’m giving you a sneak peek at one of my articles from the publication below. But first, I must tell you a bit about this magazine I am so proud to be a part of!
This labor of love is a seasonal, plant centered digital magazine bringing you over 45 articles from 30 contributors to incorporate autumnal herbs in your apothecary, kitchen, harvests, crafts, and fall celebrations.
Until 9/28, grab your copy for $20 and receive the bonus cinnamon booklet. Download instantly and dive right into the 150+ pages of plant magic!
Now without further ado, here is one of my articles!
Roasted Roots: An Herbal Coffee Tradition
Herbal coffee is a tradition that can be found, with a little digging, in many family histories. It was once common practice to replace or mix ground coffee with the roasted roots of plants like dandelion, chicory, and burdock. Not only did these easily-foraged plants make coffee go further, but they also cut some of the bitterness in the flavor. These roots also provided a nutritious and grounding alternative ingredient or replacement for coffee without the unwanted side effects of caffeine. Additional spices can be added to the mix for flavor and further health benefits, as well.
Here is a closer look at some of the ingredients you might add to your own roasted root blend.
Dandelion root
Strong liver, gallbladder, + kidney support
Vitamin + mineral rich
Supports heart + balances blood pressure
Chicory root
Vitamin + mineral rich
Digestion support
Antioxidant rich
Supports liver + stomach
Burdock root
Kidney + liver support
Anti-inflammatory • Antioxidant • Detoxifying
Antibacterial + antifungal • Skin clearing
Blood sugar regulating
Cacao
Mildly stimulating
Synergizes other herbs
Heart + blood pressure support
Blood sugar regulating
Cinnamon
Digestive support • Circulation stimulating
Blood sugar regulating • Analgesic
Antimicrobial + antifungal
Antioxidants • Supports brain health
Warming + drying
Allspice, cardamom, cloves, fennel
Digestive support
Promotes circulation • Immune support
Soothing • warming • uplifting
When cooler autumn days make you long for more cups of cozy hot coffee, consider instead roasting and brewing up this alternative herbal blend. Get creative and formulate your own flavorful blend! Or to get started, here is a simple and tasty recipe to try.
Materials
1 part dandelion root
1 part chicory root
1 part burdock root
½ part cinnamon chips
¼ part cacao nibs
¼ part allspice
Method
Preheat oven to 375°.
Spread dandelion, chicory, and burdock roots in a thin layer on a baking sheet. Roast for 10-15 minutes, stirring once or twice to prevent burning. Roast for a shorter time if using a dark or nonstick pan.
Allow to cool.
Mix in cacao nibs, cinnamon chips, and allspice.
Grind in a coffee grinder and brew as you normally brew coffee. Approximately 1 heaping tablespoon of the mixture makes 1 strong cup of herbal coffee.
Notes
Opt for a coarser grind if brewing with a French press.
If using pre-roasted chicory root, add it when mixing in cacao, cinnamon, and allspice.
This blend may also be mixed with coffee, using your desired ratio (50/50 is recommended), to reduce bitterness and caffeine.